|
Taking your photos
(After taking photos, send them to
StevenD@FacialSurgery.com)
Use the Camera app on your smart phone. When you email the photos, send
them at their largest size; don't let the phone shrink them before it
sends them. Also, be sure to send
a note describing what you dislike and what you would like to change.
 |
|
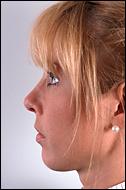
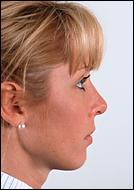
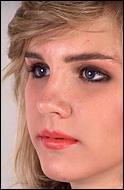
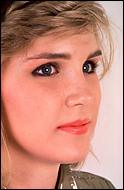
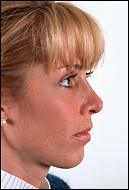
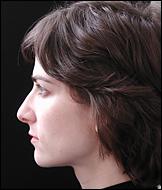
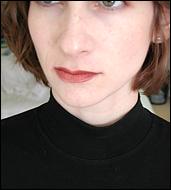
First, take two profile views and a
frontal view. |
 |
|
|
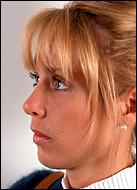
We also need
three-quarter views, but first let's take a closer look at how to
position a face for a three-quarter view.
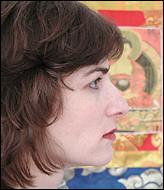
Both of the photos above are three-quarter views, also called oblique
views. The subject is not looking directly into the camera, and she
is not looking 90 degrees off to the side as she would in a profile
view. Note that in the photo above left, we
can see part of her right eye, indicating that she is turned
toward the
camera a bit. That's an oblique view.
These two oblique views are angled differently. The subject above
right is turned more toward the camera than the person above left. You should
have your face photographed in both of these angles.
|
|
 |
 |
|
|
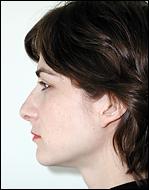
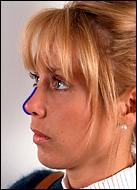
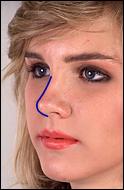
It's easy to tell which oblique view you are taking by looking at the
position of the
nose. In the photo above left, her nasal profile is off of
her face: to the left of the blue line we see the white background of the
picture. In the photo above right, her nasal profile is on
her face: to the left of the blue line we see her cheek. |
|
|
|
So, take the two oblique
views where you are turned closer to the camera: |
|
|
|
And take the two oblique
views where you are turned farther from the camera, but still not in
full profile: |
|
|
|
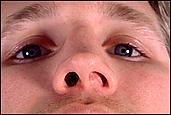
If you have a special
situation, take any other views that you think would best demonstrate
the area about which you are concerned.
That's all there is to it!
Now, I'll review some of the mistakes
people make in taking photos, all of which are easy to prevent if you know
what to look for.
|
|
This one's important: |
 |
 |
|
|
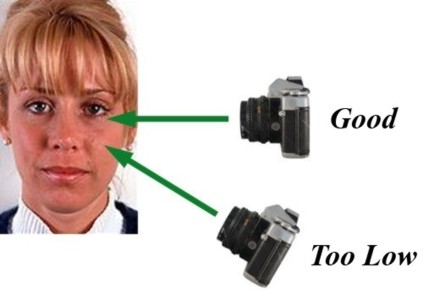
In the photo above left, the camera was down at ches t
level, and it's looking UP at her face. The camera should be at the same
level as the nose and eyes. Above right we see a little explanation of
that. |
|
|
|
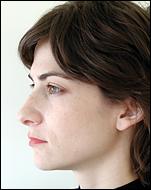
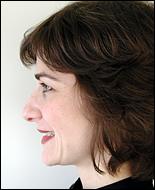
When you are taking the profile view, align the photo carefully.
Above we see a Left profile: we see most of the Left side of her face.
In this photo, though, she is turned slightly toward the
camera: you can see her right eyelashes and part of her right
eyebrow. We shouldn't be able to see her Right eyelashes and eyebrow
in this Left profile view. |
|
|
|
Many cameras won't focus well if the subject is close to the
camera. If that's a problem with your camera, you'll have to borrow
a different camera, or move back slightly from the subject so she can be
in good focus. |
|
|
|
However, don't pull back too far, as in the photo
above left. If the subject's face is only a small part of the
entire picture, the face won't show enough small details to make a good
assessment. Her face will be fuzzy when it is blown up to viewing
size.
The photo above right is her face,
extracted from the photo above left.
|
|
|
|
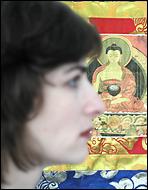
Now let's talk about backgrounds.
Black backgrounds (above left)
work as well as light backgrounds. A background that is too busy
(above right) will distract from the face's important features. |
|
|
|
Also, your camera might focus automatically, putting the face in focus
(above left) or the background in focus (above right), depending on
exactly where the lens is pointed. Check your photos and make sure
it's not the background that is in sharp focus. In any case, see how hard it is
to see her nasal profile even in the focused picture above left? The
background is too busy. |
|
|
|
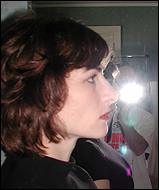
Pay attention to the location of the flash.
In this view, if you
are holding the camera so that the flash is to the right of the
lens, the flash will cast a distracting shadow on the background wall to
the left of the subject. To fix that, all you have to do is
turn the camera upside down, so the flash is to the left of the
lens. Now the shadow will be behind the subject, where it won't interfere
with our appreciation of the profile. |
|
|
|
Speaking of backgrounds, do I have to remind you not to take the
picture against a mirror? |
|
|
|
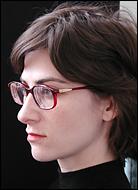
Finally, a few errors that are easy to avoid: don't wear glasses (above
left), and make sure that the photos show the entire face, even if only
one part of face is your main concern (above right). |
|
|
 Taking photos