The Rhinoplasty Operation:
page 3
Note: Enlarged views of many of the
photographs are available. Simply click on the photograph that
you would like to enlarge. Then, clicking on the enlarged photo
will take you back to your place in the tutorial.
More on the tip cartilages

 .
.
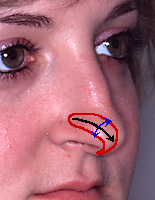
Now let's talk about the lower lateral cartilages again. We
mentioned that the size and shape of those cartilages control
most of what the tip of the nose looks like. If they are narrow
and strong and bent sharply, the person will have a well defined
tip to the nose. If they are soft and floppy, and if the tip of
the nose has thick skin covering them, then the tip of the nose
will be wide and amorphous. The cartilages shown above are wide,
and trimming off the excess width will help narrow the tip of
this nose. The red arrows in the diagram show the dimension that
is "wide." (This patient's right lower lateral
cartilage also has a very rare anomaly: the scissors tip is
pointing to a hole in the cartilage that formed because a blood
vessel was growing through the cartilage.

 .
.
If the tip cartilages are too long, they can
cause the nose to be very long, with a drooping tip.
"Long" tip cartilages are long in the dimension
indicated by the blue arrows in the diagram
above. (Red arrows have also been added to the diagram, to show
you the dimension that we call "width" of the tip
cartilages.)

 .
.
These photos show how the shape of the tip cartilages can control
the shape of the nose. Since this person's nasal skin is thin,
you can see the outline of her tip cartilages. In the photo at
left, her right tip cartilage is outlined in red. The width
of her tip cartilages (indicated in blue) is causing the excess
width of the tip of her nose, and the length of
her tip cartilages (indicated by the black line) is causing the
tip of her nose to droop. The middle images are her before and
after photos. If you look closely, you can also see the little
dent between her right and left tip cartilages in the
"before" picture. That dent is visible in many people's
noses, and it is highlighted in red in the diagram at right.


 .
.
Wide tip cartilages are trimmed by cutting the cartilage with a
scalpel (left photo), separating the cartilage from the
underlying tissue with a scissors (right photo), and then
removing the excess. The diagram in the middle shows the
excess width of cartilage that is being removed.
 .
.
Sometimes the tip cartilages are quite symmetric. That is, they
look like mirror images of each other. See how even and
similar these two cartilages are?

 .
.
But sometimes the two tip cartilages are very different. These
pictures show tip cartilages that have different bends and curves
and irregularities. They just happened to grow that way. It is
very difficult to re-establish symmetry to the tip cartilages, so
that the tip of the nose will look even and centered on the face.
(Both of these photos show noses before any alterations were made
in the tip cartilages.)

 .
.
Here is another illustration of tip cartilages where the right
cartilage is different than the left. This patient's right lower
lateral cartilage (on your left) has a fold in
it, whereas the cartilage on her left is smoother. The diagram
shows the location of the fold.

 .
.
The tip cartilages should have a gentle arch that starts at
the base of the nose, heads up toward the tip, and then continues
on up and to the side, as illustrated in the photos above. The
red in the diagram shows the gentle arch of the tip cartilages,
which are also called the lower lateral cartilages. Now look at
the tip cartilages in the photos below. There is a very unusual
inward bending of the middle portion of these cartilages. Those
of you who are plastic surgeons may recognize this as an
extremely rare congenital anomaly.

 .
.
 .
.
You've seen these photos before. We discussed that if the tip
cartilages were too long, in the direction of the arrows, it can
make the nose look long, with a drooping tip.
 .
.
One way to shorten the length of the tip cartilages is to cut
them in the middle, and then overlap the two ends before sewing
them back together:

 .
.
In this photo, the patient's right lower lateral cartilage has
been cut, and the two ends are being overlapped. In the diagram,
one cut end is outlined in red, and the other end in blue. These
two pieces will be sewn together in this position.


 .
.
Sometimes, for the right person, it's nice to set the tip of the
nose so that it sticks out ever so slightly beyond the line that
defines the profile. In the third picture above, the arrow points
to the tip of the nose, which is sticking out farther than the
line that follows the rest of the nasal profile. In order to
achieve that effect, the tip cartilages need to be strong enough
to project out forward of the profile line and hold themselves in
that position.

 .
.
The tip cartilages in these photos are strong enough to do just
that. The horizontal line in the diagram is the position of the
cartilage that determines where the dorsum of the nose is, and
you can see that the tip cartilages project out beyond that line.
(When looking underneath the skin, as we are here, the tip
cartilages must appear to project out quite a distance beyond the
line of the dorsum in order for the final result to have the tip
projected out just 1 mm. beyond the dorsum, as it is in the girl
pictured at the top of this page.) These cartilages are strong,
and it looks as though you could press on the tip of the nose in
the direction of the red arrow, and the cartilages would resist
your pressure, maintaining their position. Press on the tip of
your nose, to see how well your tip cartilages resist that
pressure and try to bounce back.


 .
.
But now look at these tip cartilages. They are so weak that they
can't even project up to the level of the dorsum of the nose. The
diagram in the middle shows the position of this patient's right
tip cartilage, and it also shows the line that defines where her
profile is. The diagram on the far right shows the cartilage that
forms the dorsum of the nose. In order to complete this
rhinoplasty, a technique will have to be used that will
strengthen and support those tip cartilages, so that they can
project beyond the line of the dorsum of the nose.

 .
.
Sometimes the tip cartilages are too wide at the very tip of the
nose, giving the impression of a ball on the end of the nose.
That problem can be helped by bending the cartilages into a
sharper angle, and holding them in that position with a stitch.
The tip cartilages shown above have suture holding them in a more
sharply-angled position. The suture is red in the diagram. We'll
see an example of what sewing the tip cartilages can do for the
shape of a nose just below.

 .
.
These tip cartilages are symmetric, but they are too wide. We
want the base of the nose to look basically like a triangle, and
the excess width of these tip cartilages keeps the tip looking
too wide. The left photo shows the natural position of those
cartilages. After bending and sewing the cartilages, we get the
appearance in the right photo, with a narrower tip and a more
triangular shape to the base of the nose. The associated diagrams
are below. The black line shows the change in the basic shape of
the base of the nose. The red line traces the contour of the
right lower lateral cartilage, showing how it was wide at the tip
of the nose, and how it was bent into a smaller angle at the tip
of the nose.


We'll call the nose pictured above the wide-base nose. Before we
show you what happened to this patient's profile, we should
introduce the concept of the nasolabial angle.
The nasolabial angle is the angle between the bottom of the
nose and the upper lip. Nose and lip. Nasolabial. See? Look at
the photos below:

 .
.
In the diagram at right, we see the nasolabial angles before and
after surgery. On each picture, one line is parallel to the
bottom of the nose, and one line is parallel to the upper lip. In
the "before" picture, the nasolabial angle is less than
90 degrees, and in the "after" picture it is greater
than 90 degrees. So a large nasolabial angle means that the nose
is turned up more.
The patient pictured above had a long nose, with an acute
nasolabial angle. After surgery, the nose was shortened
considerably, and the nasolabial angle is larger. There is no
absolutely ideal nasolabial angle. In general though, we want the
nasolabial angle to be greater than 90 degrees for anyone. After
that, there are other considerations for deciding on a good value
for the nasolabial angle and the length of the nose: 1) A woman
can have a larger nasolabial angle (a more turned-up nose) than a
man. A shorter nose often looks cute on a woman (as long as it's
not so short that it's a "Miss Piggy" nose), but a man
usually wants a longer, stronger nose. 2) A younger person can
have a larger angle than an older person. The nose tends to
elongate with age, lessening the nasolabial angle, and we want a
nose that is appropriate for the patient's age. On the other
hand, we often consider shortening a nose as part of a facial
rejuvenation operation, maybe along with a face lift, because
shortening the nose can make the face look more youthful. Note
how much younger the woman above looks in the after picture. And
3) A shorter person can have a larger angle than a taller person.
In other words, if a young woman, who otherwise might be a good
candidate for having a short, cute nose, is very tall, she won't
want such a short nose, or all of her shorter friends will find
themselves looking up into her nostrils!

 .
.
This is the profile view of the person with the wide-base nose
that we saw earlier on this page. The length of
the tip cartilages was making the nose too long,
at the same time that the wide arch of the
cartilages was making the tip too wide. These
cartilages were shortened, to allow the nose to tilt up into a
more acceptable length. In the diagrams below, the light green
line shows how the arch of the tip cartilages was narrowed and
tightened by putting sutures through the cartilages. The black
arrow in the photo at left indicates how the length of the lower
lateral cartilages is holding the tip of the nose down, making
the nose long and making the nasolabial angle small. The light
blue line shows you the nasolabial angle, and how it was opened
during the operation. The red is the cartilage of the nasal
septum, which was also holding the tip of the nose down. It was
isolated and shortened during this patient's operation.


The nasolabial angle looks very high indeed in the after photo,
but the angle will lessen when the skin is put back down over the
nose.

 .
.
Sometimes, the entire base of the nose, tip cartilages (shown in
red), skin, and everything, are separated from the rest of the
nose in order to do this work. The septum is colored blue in the
diagram.
You are at the end of page 3 of the rhinoplasty tutorial.
Now proceed to:


Or, give us your opinions:


Copyright
1996-1999 Steven M. Denenberg, M.D.,
FACS
7640 Pacific Street
Omaha, Nebraska 68114-5421
402-391-7640
800-233-7640
Fax: 402-391-6352
letters@FacialSurgery.com