The Rhinoplasty Operation
This is the first of four pages that will take you through
various aspects of a rhinoplasty operation as performed at
Denenberg Facial Plastic Surgery. This tutorial will not be a
complete primer on how to perform a rhinoplasty. Every nose is
handled differently, and it is the task of the rhinoplasty
surgeon to know literally hundreds of different surgical
techniques and decide when each should be used, and in what
order. You will be introduced to a few of those hundreds of
techniques.
Your angle of view will be the same as a right-handed surgeon
-- you are standing on the patient's right, and the patient is
reclining with her head slightly elevated. Dr. Denenberg
performed all of the surgery. Do not try this at home.
Before you leave the tutorial, please use the "Feedback,
please" button at the bottom of any page to tell us whether
you liked this presentation of how the rhinoplasty operation is
done.
Note: Enlarged views of many of the
photographs are available. If you want to see an enlarged view,
simply click on the photograph that you would like to enlarge.
Then, clicking on the enlarged photo will take you back to your
place in the tutorial.
An overview of the operation
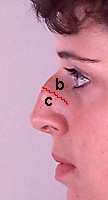
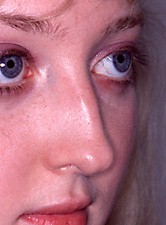
The nose is a framework of bone and cartilage that is covered by
skin. The nose is made out of bone in its upper third, and the
lower two-thirds of the nose is cartilage. Grab your nose high,
between your eyes, and try to move it back and forth. You can't,
because that's where your nose is made out of bone. If you grab
lower and lower on your nose, moving closer to the tip, you will
reach an area where the nose stops being made out of bone, and
rather consists of soft cartilage that you can
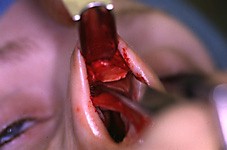
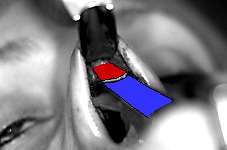
move back and forth. If a nose has a hump, such as the one in the
photo above, the junction between the bony portion of the nose
and the cartilaginous (made of cartilage) portion of the nose is
usually right at the highest point of the hump. In the figure
above, "b" represents bone, and "c" shows you
where there is cartilage in this nose.
The skin is "shrink-wrapped" on that framework of
bone and cartilage. The rhinoplasty operation has three basic
parts:
- Separate the skin from the underlying cartilage and bone,
so that we can see what the framework of the nose looks
like, and we can thus know why the nose is shaped the way
it is.
- Alter the framework of bone and cartilage so that the
nose will take on a new and hopefully better shape.
- Allow the skin to cover the new framework. The skin will
shrink-wrap to the new framework, and reveal the new
shape of the nose.
It is step number 2 that takes the skill, judgment, and
training to accomplish expertly.


 .
.
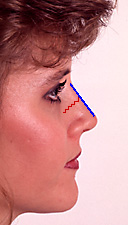
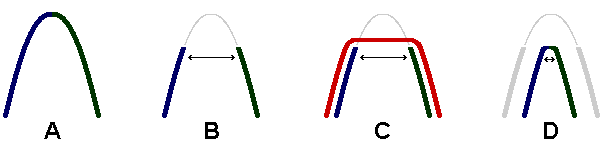
Next, we'll discuss a little terminology. The blue line on this
person's nose traces the part of the nose that we call the
"dorsum." It is called the dorsum whether it is seen in
profile, as in the left-most two pictures, or in a three-quarters
view, as you see in the right-most two pictures. Some people call
this the "bridge" of the nose. In general, we will call
it the dorsum. In red, the diagrams remind you that the upper
part of the nose is made out of bone, and the lower part of the
nose is cartilage. Thus, the upper part of the dorsum is bony,
and the lower part of the dorsum is cartilaginous.
 .
.
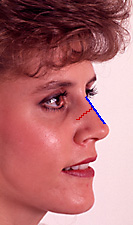
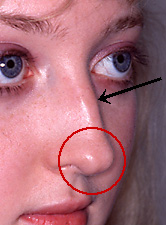
When we discuss the "tip" of the nose, we will be
referring to the part of the nose circled in red, above. A
"hump" on a nose is a prominence along the dorsum, as
indicated by the black arrow.
In this rhinoplasty tutorial, we will discuss:
- How to get into the nose, so that we can do the work
- What we do with a hump
- How and why we work on the tip of the nose
- What is the septum and why it is altered in a rhinoplasty
- Some aspects of revision rhinoplasty
- The postoperative dressing
Let's begin
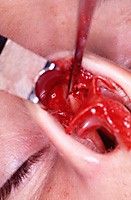
First item: sedate the patient. Sedation medicine is put
slowly into the intravenous line, as illustrated below, until the
patient is dozing. After she is snoring lightly, the nose will be
numbed, just like the dentist numbs a tooth before working on it.
Because of the sedation medicine in the IV, the patient will not
feel having her nose numbed. She will not feel anything during
the operation, and she will not remember any of the surgery.
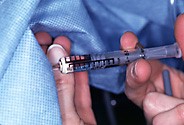
The general term for this kind of anesthesia is "IV
sedation," and we feel it is better than using general
anesthesia for a rhinoplasty.
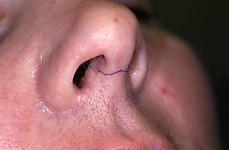
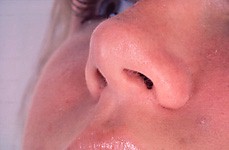
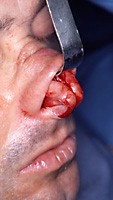
Typically, all of the incisions for a rhinoplasty are hidden
inside of the nose, except for the small incision marked in the
photo at left. The incision crosses the central part of the base
of the nose. That part of the nose is called the columella, and
the planned incision you see in purple is called the columellar
incision. The photo on the right shows how well that incision
usually heals.
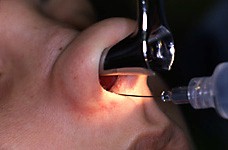
When the patient is adequately sedated, and she appears to be
sleeping, the nose is injected with xylocaine and epinephrine.
The xylocaine numbs the nose, and the epinephrine shrinks the
blood vessels, so that there is very little bleeding during
surgery. A typical blood loss during a rhinoplasty is two or
three tablespoons, even if the operation lasts a couple hours, as
it usually does in my hands. The patient feels nothing of this,
because of the sedation.
 .
.
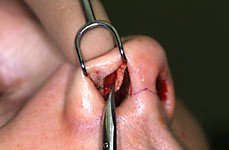
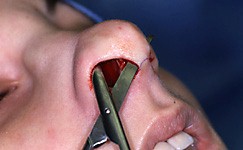
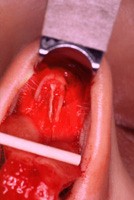
A rhinoplasty, like many operations, begins with the making of an
incision. There are many places inside the nose to make
incisions. They all have different purposes, and are selected
depending on what the surgeon wishes to accomplish during the
operation. The incision pictured above is called a "marginal
incision." Other incisions have names like "transfixion
incision," or "intercartilaginous incision," or
"transcolumellar incision."
In many of these photos, you will see some silver instruments.
Generally, the surgeon uses one instrument with his left
(non-dominant) hand to hold the nose position, while he works on
the nose with an instrument that he holds in his right (dominant)
hand. For example, in the photo above, I'm holding the nose with
a double hook in my left hand, and I'm working with the little
scissors in my right hand. In the photo just above the one we are
discussing here, the silver instrument that is coming from the
top of the photo is called a nasal speculum. It allows the
surgeon to get a good look at the inside of the nose. I am
holding the speculum in my left hand so that I can see exactly
where I want to place the injections with the syringe that I'm
holding in my right hand.
 .
.
Working through the marginal incision, we begin the process of
separating the cartilages of the tip of the nose away from the
overlying skin. Note that we haven't yet cut across the skin
where we marked the columellar incision.
 .
.
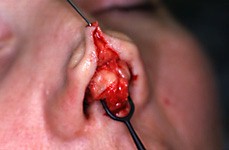
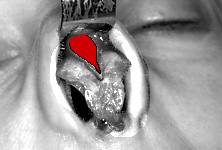
Now the columellar incision is cut, and we can begin pulling the
skin off of the cartilages that form the tip of the nose. The
"tip cartilages" are also called the "lower
lateral cartilages." The tip cartilages are a little yellow.
The image on the right has the tip cartilages colored red, to
assist you in identifying them.
 .
.
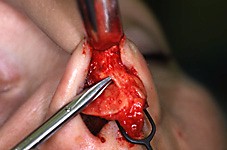
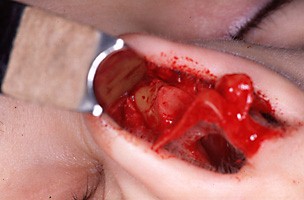
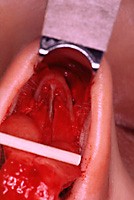
We continue the process of lifting the skin up off of the nose's
cartilages. The scissors is lying on top of this patient's right
tip cartilage, colored blue in the diagram. (Remember, the patient's
right is on your left.) The tips of the scissors
are underneath some soft tissue that is connecting the tip
cartilages to the skin of the nose. The soft tissue is colored
red in the diagram. That soft tissue is being released so that we
can get a better view of the cartilages, so we'll know what to do
to them. The silver object at the top of the photo is a
retractor, which is holding the skin up so that we can see and
work on the tip cartilages.
 .
.
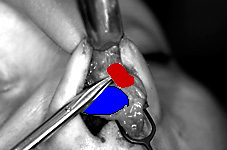
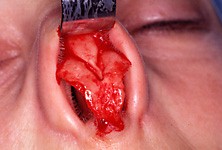
In this photo, the soft tissue has been released from the lower
lateral cartilages. You can see that there are two
lower lateral cartilages, one on the left and one on the right.
These cartilages control much about the appearance of the nose.
If they are wide, the person will have a "ball" on the
end of his nose. If they are long, they can make the tip of the
nose droop.
 .
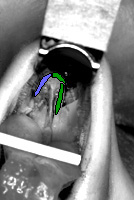
.
As we continue to lift the skin off of the cartilage framework of
the nose, we see the cartilage that forms the dorsum of the nose
(colored red in the diagram). Remember that the
"dorsum" is the line that goes from the point between
your eyes down to the tip of the nose. You can also see the left
and right lower lateral cartilages that sit on either side of the
dorsum, closer to the tip of the nose.
 .
.
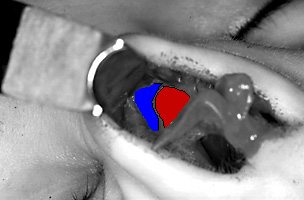
As we raise the skin even higher, we see the nasal bones. The
nasal bones usually appear somewhat yellow. In the diagram, the
nasal bones are colored blue, and the cartilage that forms the
lower part of the dorsum of the nose is red. The dark cartilages
in the diagram below the red area are the cartilages that form
the tip of the nose.
Handling the hump and the nasal bones
If the nasal bones are large and protruding, they can create a
hump along the dorsum of the nose. Since the upper part of the
nose is made out of bone, labeled "b" in the picture
above, and the lower part of the nose is made out of cartilage,
"c," the hump is usually half cartilage and half bone,
with the junction of cartilage and bone right at the highest
point of the hump.
 .
.
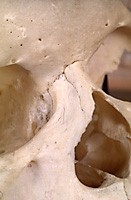
If a hump of bone and cartilage is to be removed, the cartilage
is removed with a scalpel (a knife), and the harder bone is
removed with a chisel or a file. Above, we show you, on the
skull, the location of the bone that is typically taken off in
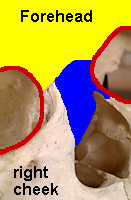
the removal of a hump. First, let's get oriented to the skull. We
are looking at the skull from the same angle as most of the other
photos in this tutorial. The red rings show where the eye sockets
are, the yellow is the forehead, and the blue is the bones of the
bony part of the nose. The rest of the nose is missing, because
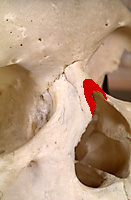
the soft skin and cartilage disappears in the preparation of a
skull. The skull on the right shows in red the area of bone that
would typically be removed in taking down a bony hump.
 .
.
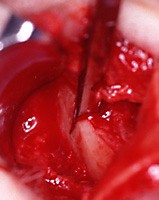
And here is what it looks like when the cartilage and bone of a
hump are being removed with a chisel. The chisel is blue in the
diagram. The cartilage and bone to be removed (red in the
diagram) are above the surface of the chisel. The silver object
at the top of the photo is the retractor, holding the skin up so
that you can see.
 .
.
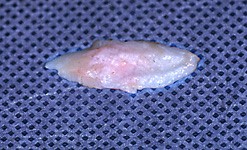
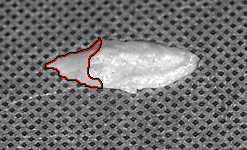
This is a picture of a bony and cartilaginous hump that has just
been removed from the nose. The bone is the smaller smooth
portion on the left, and the cartilage is the larger, shinier
whitish portion on the right. On the diagram, the bone portion is
outlined in red, and the rest of the piece removed is made of
cartilage.
Now we have explained what's involved in removing a hump on a
nose. Next, we'll discuss why the nasal bones are often
"narrowed" during a rhinoplasty, and just what that
means. Narrowing the nasal bones is what is frequently called
"breaking the nose" in lay terms.
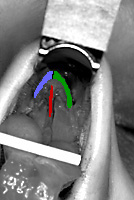
Let's take a closer look at what happens to the nose after a
hump has been removed. Look at the diagram below, with four
figures labeled 'A,' 'B,' 'C,' and 'D.' In 'A' we see the hump of
the nose in cross section. If you were an ant walking from one
cheek, across the nose, to the other cheek, you'd have to ascend
this arch, climbing over the hump of the nose. The photo just
under the diagram shows in black the arch that the ant would have
to climb over. That part of the nose, the arch made out of bone
that you can feel when you pinch the upper part of your nose, is
called the "bony pyramid."
Now let's assume that we have used a chisel to remove the hump
on this nose. After removing the hump, the arch has been
truncated, as shown in 'B,' and now the dorsum of the nose is
closer to the face, where we wanted it, but it is also now too
wide. If the ant were to walk from one cheek to the other cheek
now, he would have a plateau to cross after climbing up onto the
nose. The ant's path, with the plateau, is shown in red in
"C."
In order to make the nose more narrow, we move the remaining
nasal bones closer to each other, as in 'D.' Now we have a nice
narrow bony pyramid, and the top of that arch is closer to the
face, because the hump is gone.
 The bony pyramid of
the nose.
The bony pyramid of
the nose.
 .
.
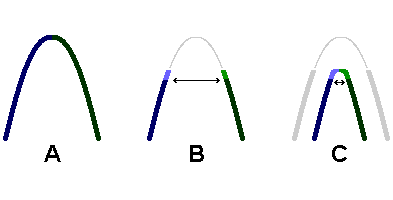
Here's what it looks like inside the nose after the bony hump has
been taken off. In the diagrams, the patient's right nasal bone
is colored blue (her right nasal bone is on your
left) and her left nasal bone is colored green. We are looking at
the tops of the nasal bones after the hump has been removed. The
bony pyramid of the nose is now too flat and too wide, and it
needs to be narrowed. (You will learn about the red line later in
this tutorial.)
This photo shows what it looks like after the patient's left
nasal bone (in green) has been moved inward. (The image above has
been altered in a graphics program. It is the only photo in the
intraoperative section that is retouched.)
 .
.
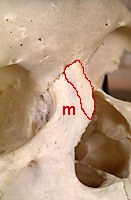
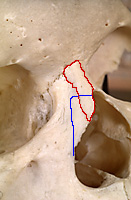
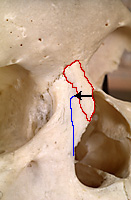
The skull above shows the right nasal bone highlighted in red.
The bone just below the nasal bone, labeled 'm,' is called the
"ascending process of the maxilla." Actually, it is
not, strictly speaking, the nasal bone that is moved inward
during the rhinoplasty. The piece of bone that is moved inward is
partially the nasal bone and partially the ascending process of
the maxilla. In the photo below, the nasal bone is outlined in
red, and the area outlined in blue is the bone segment that is
moved inward to narrow the dorsum of the nose.
 .
.
The photos above show a small (2 mm wide) chisel being used to
make the cut in the bone indicated by the black arrow in the
diagram at right. The middle photo is an enlargement of the area
of the chisel cut.
One of the most common questions I hear from patients
considering whether to have a rhinoplasty is "Will you have
to break my nose?" Many people, when they think of
"breaking the nose" during nasal surgery, picture some
big man coming into the operating room with a sledge hammer, and
bashing them in the face. The photos with the chisel just above
are what actually happens when the nose is "broken."
Very small, controlled cuts are made in the bone, so that the
lateral walls of the nose can be moved inward, narrowing the
upper part of the nose. In skilled hands, this part of the
operation takes one or two minutes to perform, it doesn't
increase the bleeding or the bruising or the swelling, and the
patient can't feel anything, so she doesn't even know it was
done.
You are at the end of page 1 of the rhinoplasty tutorial.
Now proceed to:


Or, give us your opinions:


Copyright
1996-1999 Steven M. Denenberg, M.D.,
FACS
7640 Pacific Street
Omaha, Nebraska 68114-5421
402-391-7640
800-233-7640
Fax: 402-391-6352
letters@FacialSurgery.com